

I had a few old mold Tamiya kits and I decided to finish these kits by combining them. For this purpose, I started the construction of the 1/35 size M48A3 Patton tank. Old mold Tamiyas are highly preferred due to their low price. But the patterns are old and the details are scarce. However, I started to assemble the kit I had.

Although the building phase of the model was not troublesome, there were some snapping errors in some places due to the old mold. There was a problem with the tank commander's cupola in the turret snapping into place. There were gaps in the body, since it was actually a kit that could be made mobile. Since the barrel is given as 2 pieces, it caused trouble during assembly. Apart from these problems, we have an easy-to-assemble kit.

After the assembly phase of the model was finished, I primed the tank with gray color. While I used to prime the models with black color, now I plan to prime them with lighter colors. If a dark primer is used, the color of the tank will also be in a dark tone. It becomes impossible to lighten this dark color later.
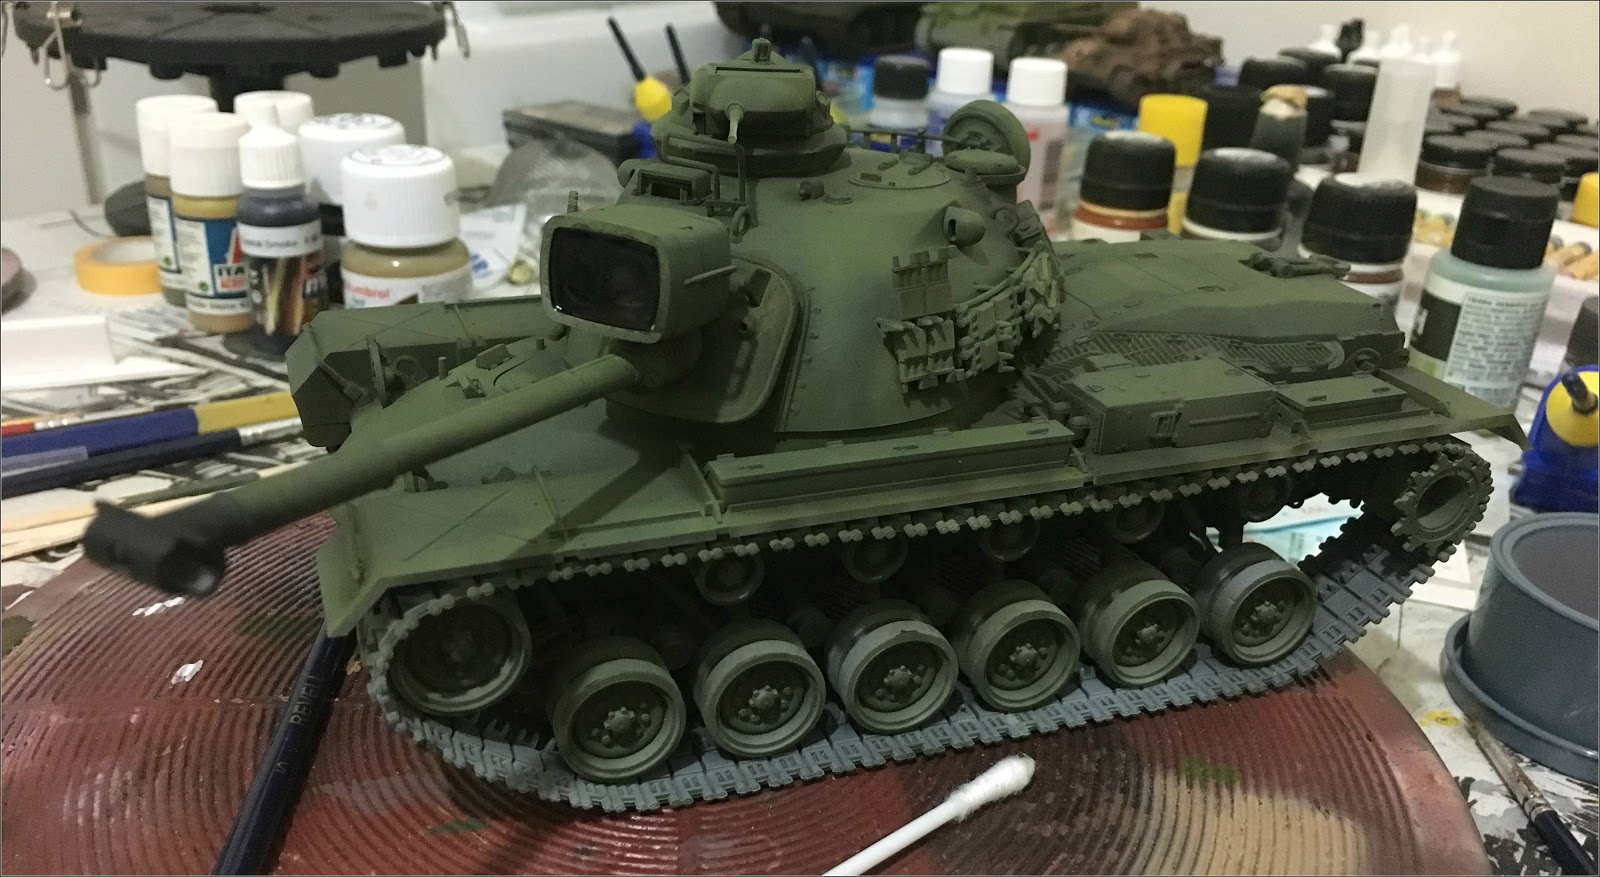
I painted the tank with olive drab as the main color. Since I will be using this tank to gain experience, I wanted to try different techniques. I lightened the color a little more and sprayed it on flat surfaces. Finally, I lightened the color a little more and sprayed it on the protruding points of the model.

The biggest problem of monochrome tanks is that the paint looks monotonous. I think that the applications I made in the previous stage are the solution to this problem. It looks very nice when black soot is sprayed on the grilles on the back of these tanks. I also used this technique.

I made black soot spots on the muzzle of the tank. After this stage, I was actually satisfied with the main color and moved on to painting the details. First of all, I painted the spare track parts on the side. I painted the machine gun and the rubber parts of the spare wheels mounted on the turret with anthracite.

I painted the tracks of the tank in tar black and the wheels in anthracite. I painted the front lights in transparent white and silver. I painted the transparent part of the light source attached to the top barrel with crystal black and finished painting the tank. Actually, how would I know that painting phase wasn't over.

At this stage, I sent the picture of the tank to my friend Mustafa, who is engaged in modeling hobby. He told me that I had painted wrong and that I had to paint by changing the green color with yellow. Again, he suggested that I should highlight the protruding parts with a very, very light green color.

Painting works got out of hand after this stage. I did as Mustafa said and mixed yellow paint with green and painted the tank once again. Then, I lightened the green color more and painted the protruding parts with this light color paint once more. This is how the main painting phase is really finished.

After the tank was repainted, I had to fix the paint of different colored parts that got green paint on them. So I went over these pieces again with the colors I had originally painted. Now it's time to clarify the paint I made.

At this stage, I had to lighten the green color that I painted the model more and apply it to the protruding parts. I lightened the color well and applied it to these parts with a brush. But I think I misunderstood this light color part. The color was like phosphorescent. I needed to fix this.

Since this phosphorescent green color was incompatible with the main paint of the model, I lightened the green paint with yellow and white and repainted the protruding parts. But for some reason, the color in the lower layer became very dominant and I could not make this color invisible.

In order to solve this problem, I applied the main color directly to the parts that I highlighted. At first though, this bright color did not fade, but as the paint dried, I applied another coat and finally got rid of this bright color.

After correcting the mistakes of the painting, I varnished the tank with glossy varnish and waited for it to dry. It is very important to apply glossy varnish before and after applying decals. Thanks to this process, we protect the decals between two layers of varnish and prevent them from shining and being artificial.

I preferred the yellow ones from the decal sets that came out of the box. I decided this way because I thought they would contrast nicely with the green color. It was difficult to apply the C23 decals on the sides of the turret. The handles and track pieces on the turret edge prevented me from placing the decals. So I had to cut the decals and then glue them.

I placed the playboy bunny decal from the kit on the front of the turret of the tank. Actually, using this decal is historically unrealistic. In my opinion, changes can be made in this way while modeling, even if it does not comply with historical references.

Finally, I placed the lip and eyes decals on the front of the tank's hull. Naturally, these decals are the most distinctive feature of the tank. The upper and lower parts of the lips did not match. I painted the gaps in between with red color.

After the decal application phase were finished, I applied glossy varnish again and left it to dry. In the meantime, I also painted the tow ropes that I forgot to paint. After the varnish dried, the colors completely found their shades. The varnishing part is a step that truly reveals the paint of the tank. After varnishing, the models begin to be pleasing to the eye.

The parts of the tank that I painted transparent became matt after varnishing. I painted the light mechanism on the barrel with crystal black. I had to repaint this piece after varnishing because the glass of the lamp became dull.

There were too many periscope lenses on the tank. These parts had to be painted in accordance with the original. First, I made lenses out of clear plastic for 3 periscopes on the front. Then I made a lens from transparent plastic and glued it to the periscope in the turret.

I painted the periscope lenses on the turret and hull with crystal green. I painted the lenses on the commander's cupola with crystal blue and crystal green paints. The realistic painting of these lenses adds realism to the tank.

There was no part left to paint on the tank. After the varnish was completely dry, I proceeded to the washing process of the tank. I didn't want the tank to get too dark. That's why I didn't do the washing process very intensively.

I used a ready to use Humbrol black wash for washing. Humbrol's wash solutions are very thin and do not leave much residue. I preferred these solutions as I did not want to make the tank dirty excessively.

After the model was washed and dried, I varnished the tank with matt varnish. Matt varnish provides ease in the weathering phase and makes the tank look more realistic. That's why I prefer matt instead of semi-matt as a varnish in the final stage.

While I was waiting for the varnish of the tank to dry, I started to prepare the items that I would place on it. First of all, I started to paint 2 magazines, 2 drums and 3 bags included in the kit. I reused a blanket from another model for this tank.

I used green tea for the camouflage net that I would place on the tank. First I wet the piece of paper well with glue. Then I poured green tea on it. When it dried, I painted and washed it. In this way, I have a camouflage net to use on the model.

I dipped a napkin in a mixture of water and glue for the tarpaulins I would place on the tank. Then I gave it the shape I wanted and dried it. After it dried, I painted it with khaki color and washed it.

I placed 3 flasks from different kits, 2 backpacks, a wooden saddle, a chest, a binocular, 2 rifles and 4 helmets on the tank. I tried to break the monotonous image by painting these materials in different colors.

I added some of the materials I prepared to the saddle and the rest to the rear of the tank's body. I also tied the materials in the body with a rope. It is important to place and connect these materials realistically. Otherwise, the image spoils the naturalness.

After adding the items I prepared, I started the weathering phase of the tank. Normally I start from the trunk and work my way down, but this time I tried a different method and started from the tracks. First of all, I washed the pet part of the tracks with earth color. I also washed the iron parts in rust color. Finally, I did dry brushing on the pets. I applied the same processes to the track parts in the turret.

While I was wearing the wheels and both sides of the model, I took the mud, dust and rust effects to the brush. Then I sprayed these effects on the tank by blowing the brush with the airbrush. Instead of applying such weathering products directly to the model, spraying with the help of airbrush created a more natural look.

I also aged the back and front of the tank in the same way. Dust and soil must be splashed on a tank with such mud on the sides. Thinking this way, I sprayed the mud and soil on the sides and the top as well.

I started to wear the body part of the tank with sponge and black paint. This time, I did not exaggerate the chipping with a sponge. Generally, once you start chipping with a sponge, you can't stop yourself. But this time I restrained myself and stopped chipping without exaggerating.

It was time to make the dust and rust streaks. First I did the streaks with streaking grime starting from the turret and then with the rust effects. These streaks are really important. Because the tanks are not constantly cleaned and over time, traces form on them. These traces add realism to the model.

As I always do, I completely covered the tank with white spirit and got a wet surface. I took a small amount of rust and dust washing liquids and applied it to the wet surface. In this way, instead of accumulating in one place, rust and dirt spread and remain in a fine texture.

When you apply dust on a wet surface, dust also accumulates in parts such as the springs of the covers. In this way, we prevent it from remaining in the form of sediment and the model get dirty naturally. Dust and dirt texture has accumulated too much in some places in this tank.

The tools on the tank looked very clean compared to the tank's body. So I added some dirt and dust on the tools as well. After all, it is natural for them to get dirty because they are left in the open. I also ran mud on the rope holding these tools. In this way, I ensured that those ropes were also dirty.

I used this tank for testing purposes. The construction phase was like a lesson that taught me a lot in terms of model making. Although it is not a very high-level model, it was a work that took me one step higher as an experience.

I put it on display with the model's finish and proceeded with the making of another Tamiya's inexpensive kit.

No comments:
Post a Comment