

Trumpeter produces models that are very suitable for modification, thanks to the softness of the plastic used in the kits. I recently took the Elefant kit, which I've been wanting to build for a long time, and started assembling it on the workbench. Like all the models I've made lately, this kit is in 1/72 scale. I plan to do a two-tone camouflage paint job for the tank.

Firstly, I started assembling the model. The tank has a peculiar setup; the panel with the engine doesn't fit in its place properly. I had to join and putty that part as best as I could.

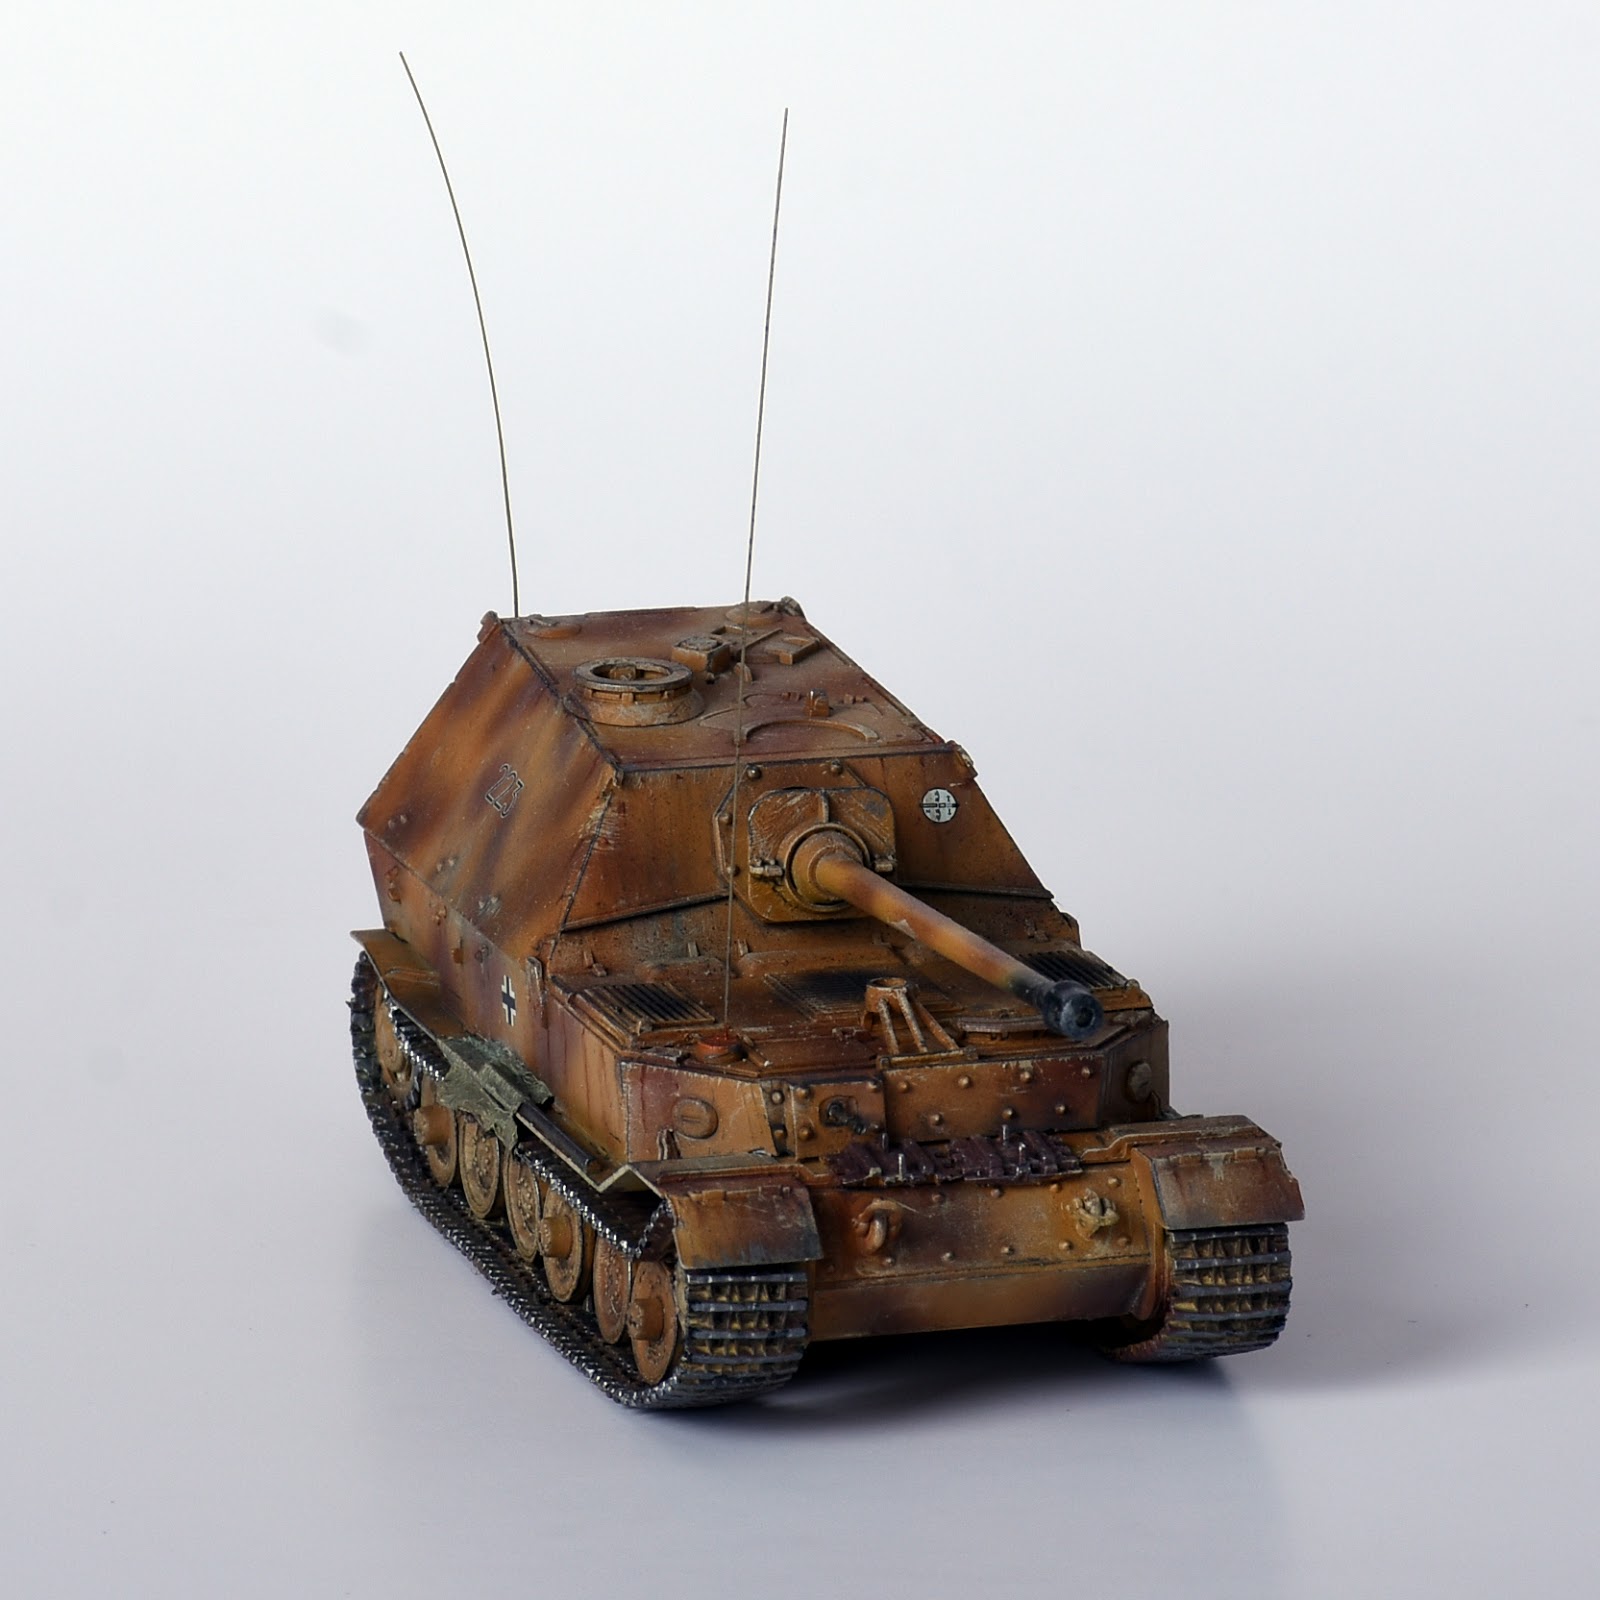
Since the most distinctive feature of this tank is the sagging of its tracks, I wanted to make this part realistic. The tracks looked quite bad in their original state, so modification was necessary.

I first placed longitudinal plastic rods inside the tank's body. This provided support for the needles I would add later.

In the next step, I passed the needles through the plastic by drilling holes and created a sagging effect on the tracks. I secured the needles to the body and plastic rods with super glue [CA].

As the tank's fixed turret is a single piece, the assembly stage finished as soon as the tracks were done. To reveal any errors made during the tank's construction, I primed it. I waited for the primer to dry.

After the primer dried, I fixed any noticeable errors. Before painting, I added a soot effect to the tank's barrel using black spray paint. I might have exaggerated the effect a bit, but I corrected it during the painting stage.

I applied the base color, yellow, to the tank. I actually thinned the color before painting, but when all the paint was done, the main color seemed a bit too dark for me.

I used a reddish-brown color as the secondary color. Due to overspray from the airbrush I used, the paint spread onto the yellow parts and darkened that color.

To conceal the seams of the tank's vinyl tracks, I hung canvas strips down from the sides. I made these canvases from white tapes used for faucet insulation.

I painted the hanging canvases on the sides with Vallejo Canvas color and then dry-brushed them with khaki brown.

I painted and completed the equipment and tracks on the tank. Since the tank didn't have a lot of equipment, this stage went quickly.

After the main painting, I started dry-brushing. Normally, I do quite a bit of dry-brushing, but due to the dark color of the tank, I overemphasized this application a bit. However, it didn't bother the eyes too much once the tank was completed.

Along with dry-brushing, I also applied light-colored paint to the protruding parts on the tank. This gives a sunlit effect to the protruding parts, adding depth to the tank.

At this stage, I added radio antennas to the tank. Although they didn't look bad to the eye, I noticed they were a bit too long when looking at the pictures.

Once all the painting applications were done, I applied a glossy varnish to the tank. After the varnish, the colors sit well and blend nicely. Once the varnish dried, the paint started to look very good.

After the varnish dried, I placed the decals on the tank. It was challenging to fit the decal on the protruding part at the back, but other than that, the decals settled nicely. Decals from new kits generally don't pose many problems. I think the decals in old kits become difficult to adhere due to aging.

After the decals dried, I applied a layer of glossy varnish once again and waited for it to dry. As mentioned in my previous models, trapping the decal between two layers of glossy varnish prevents it from shining excessively.

After the glossy varnish dried, I started playing with the tank's color using oil paint. First, I filtered the tank using white, yellow, and burnt sienna colors. Filtering not only blends the colors but also fades and brings them closer to reality.

After the filter dried, I applied small dots of different colors of oil paint with a toothpick to the flat surfaces of the tank. I spread these paints with a brush dipped in turpentine using circular motions, creating different tones.

On the vertical surfaces of the tank, I made dots with different colors of paints again. This time, I pulled the paint downward with a flat brush dipped in turpentine, breaking the monotony and creating streak-like patterns.

Once the oil paint stage was finished, I moved on to washing the tank. I washed the tank with a mixture of turpentine and oil paint that I prepared myself. Using a ready-made solution would have been better, but I chose this method once, and I had to stick with it. I had to redo the pin-wash on some areas that didn't satisfy me.

After the wash, when the tank dried, I applied a matte varnish to it. As always, matte varnish creates a textured surface, making weathering processes easier.

After the matte varnish dried, I started weathering. I usually start weathering from the bottom and work my way up. Therefore, I first worked on the tracks. I dry-brushed the entire tracks with metallic paint.

After dry-brushing, I weathered the side surfaces and wheels with different dust solutions. Now, I no longer do heavy weathering; I opt for light dusting. Finally, I filled the spaces between the tracks' surfaces that touch the ground with dust and dirt.

I washed the front and rear surfaces of the tank in a similar way with dust solutions. After the washing process, I added pigments to some hidden areas.

I made rusty streaks downward on the large side surfaces of the tank. In some places, these streaks became dominant. I tried to thin them out, but before causing damage to the white spirit varnish layer, I stopped without going too far.

I added accumulations of dust to the fenders and streaks. Since I thought these areas were heavily worn, I dry-brushed them with metallic paint to create friction marks.
I created friction marks on all the sharp edges of the tank with a lead pencil and graphite pencil. This way, the wear looks very natural. When two different colors of shine appear, the tank achieves a more natural look.

For the grilles on the tank to look natural, I created smoke traces with black pigment, starting from the middle and gradually decreasing towards the sides. Blowing from the middle is the most accurate way to apply this technique. It doesn't look very natural if we make the entire thing pitch black.

I did weathering with a sponge on the parts where crew members could leave marks, making it look natural. It's necessary to be careful when applying this technique in 1/72 scale; otherwise, it can distort the perception of size.

While adding dust, since I erased the effect of the wash, although it's technically incorrect, I had to do pin-wash again. Especially, the wheels had deviated a lot from realism. With this application, they became more pronounced.

I made rusting on the spare tracks at the back and the track parts at the front. The rust on the back didn't turn out well, especially the front ones ended up too distant.

I finished the tank by creating a metallic polishing effect on the sides of the hammer at the back. Trumpeter is already a brand I like, and the construction of this tank was very enjoyable. Another 1/72 scale is up next.

After completely finishing the tank and taking pictures, I put it in the showcase and took another kit to the workbench. If you're interested, I recommend this kit I just built.

No te ha quedado mal, pero a este carro hay que representarle el zimmerit.
ReplyDeleteMuchas gracias por tu amable comentario. Tienes razón, como dices, habría quedado mejor con zimmerit. Lamentablemente, este es un modelo antiguo y se rompió al quedar atrapado bajo las estanterías que se derrumbaron durante el terremoto. Si algún día hago uno nuevo, sin duda lo haré con zimmerit aplicado.
Delete