Tuesday, December 19, 2023

Panzer Jaeger IV L/70 | Matchbox | 1/76


While browsing the internet, I came across a very old Matchbox kit. Succumbing to my curiosity, I bought the kit. I had previously made another Jagdpanzer IV kit, but it turned out poorly. So, I decided to make another one and placed the kit on the workbench. This time, the kit we made is a Panzer Jaeger IV L/70 tank in 1/76 scale.


Firstly, during the assembly of the tank, the thickness of the plastic caught my attention. The model industry has advanced significantly over time. Models are now made from much thinner plastic, making the construction more enjoyable.


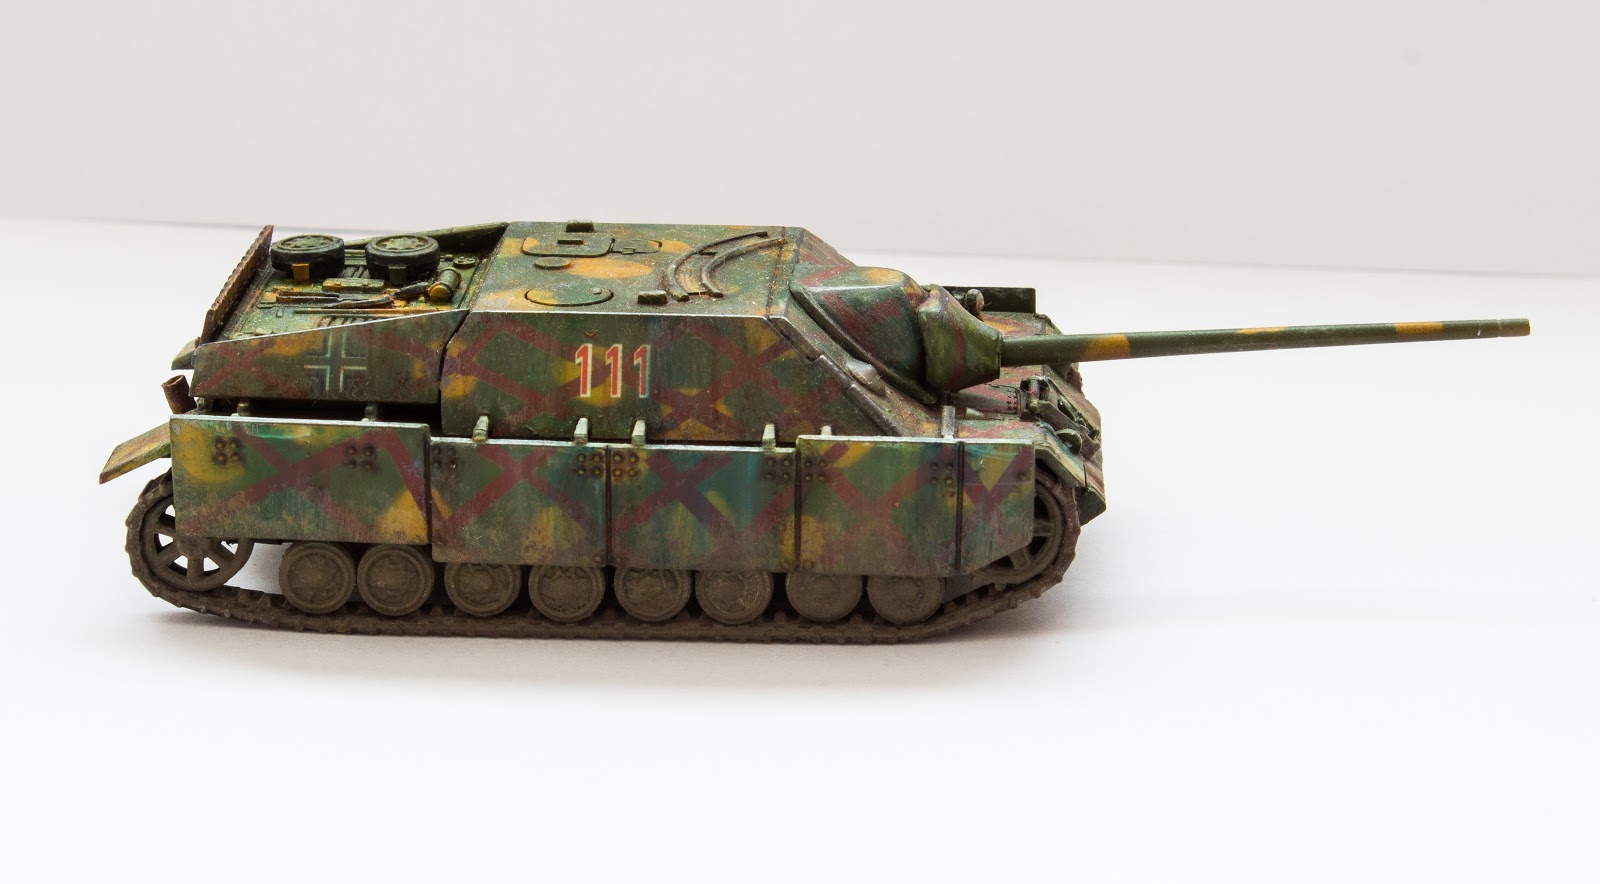
The tank's tracks were quite thick and did not look realistic. Since I didn't have alternative tracks, I had to use the original ones. There were also fitting issues with many parts, especially the side guards, which caused some difficulties. I was relieved when the assembly was finally completed.


With a three-color camouflage in mind, I started painting the colors one by one. I first applied the red oxide color and, after it dried, masked it for the next layer.


After masking, I applied the dunkelgelb, a yellow color, and waited for it to dry. With this color, I created the spots on the tank. In retrospect, I should have used a thinner and lighter color, as there was a noticeable difference in layers. Applying the paint thinly creates subtle boundaries, resulting in a more pleasing appearance.


Finally, I applied the green color, and the painting stage was completed. The green color, however, made the tank look very dark. I didn't expect it to be so dark, and I should have lightened the color.
 

When the painting phase was completely finished, I removed the tapes on the tank one by one. The resulting image was exactly what I wanted. The only thing that bothered me was the differences in paint layers.


Once the camouflage painting was done, I moved on to painting the details, such as the tracks and rear wheel parts. I painted the spare wheels in a suitable color. Painting small parts like shovels and picks, which are almost embedded in the base, was challenging.


After finishing all painting processes, I applied a glossy varnish. I don't want to use too much gloss varnish anymore, but it makes the weathering process much easier.


Once the gloss varnish completely dried, I applied the decals to the tank. Since the decals included in the kit were damaged, I used miscellaneous decals from my collection. I had plenty of German decals, so I didn't encounter any issues.


After the decals were in place, I applied another layer of glossy varnish. Applying varnish in layers helps protect the decals between two varnish layers and prevents them from shining too much. Preventing the decals from shining is crucial, as fixing this mistake later is challenging.


Once the glossy varnish was completely dry, I moved on to my favorite stage. For some reason, weathering with oil paints has become my favorite. Oil paint removes the glossiness of the tank and beautifully blends the colors. 


Using burnt sienna oil paint, I started with a filter on the entire surface of the tank. The filter helps blend the tones of different colors and textures of our paints. This stage is crucial.


Next, I applied a filter with a yellow color. I chose light tones for this stage because I needed to lighten the color a bit. Finally, I used white paint to create filters. I let the tank dry. Oil paint takes a very long time to dry.


Once the filter was completely dry, I touched different colors of oil paints with a toothpick on the side surfaces of the tank. Then, using a brush dipped in white spirit, I pulled down, allowing the paint to spread. This way, I achieved contrasting tones and broke the monotony.


After finishing with the side surfaces, I moved on to the flat parts of the tank. Here, I used a toothpick to touch different colors of paints. Unlike previous processes on flat surfaces, I spread the paint by drawing circles with a brush. This way, I created contrast again.


After completing the oil paint processes and letting the paint dry, it was time for washing. I could have applied varnish again before washing, but I chose not to. I washed the tank very lightly and only in areas where dirt would accumulate.


Honestly, the washing part pleased me a lot. The tank didn't get too dark, and the corners and edges of the tank became nicely pronounced. I used panel liner in some places because it flows well and looks good on the model.


After the wash, once the tank was completely dry, I began my next step: applying a matte varnish to the tank. Applying matte varnish before weathering creates a rough surface, making it easier for particles to adhere. Therefore, applying matte varnish is essential.


After the matte varnish completely dried, I first applied Vallejo Rainmarks to the tank. However, no matter what I did, I couldn't dilute this solution on the tank. Almost all the applications I made on the tank were erased at once. I wish I had tried it somewhere else first. This was a lesson for me.


After recovering from the disaster, I returned to the model. First, I applied various dust solutions to the wheels. Actually, if I had done some pinwash, the wheels might have looked better, but I didn't anticipate that at the time.


I also applied dust to the front and back of the tank, touching the brush wherever dust could stick. I added some dust to the lower parts of the side guards as well.


After the dusting stage, I created downward streaks on the vertical surfaces of the tank. The thickness of such streaks is crucial, and they shouldn't be too prominent; otherwise, a non-realistic appearance is created.


I tried to give a rust effect to the spare tracks and exhaust outlets at the back. Lately, I've been trying a lot of these rust effects, but I still haven't achieved the desired look. I need to work more on this aspect.


To give a metallic effect to the parts of the tracks that touch the ground, I dry-brushed them with suitable paints. I added both rust and dust to the spaces in between. In the final step, I applied pigments to finish the tracks.


I tried to depict the residue of the post-firing on the tip of the tank barrel and the exhaust outlets at the back using the soot pigment I had. But, I think I applied too little fixing agent, and it practically all came off the barrel tip. I filled the inside of the exhaust and barrel with the panel liner.
 

To make the tank corners shine and give a metallic effect, I used a lead pencil and graphite pencil to create reflections. This application is crucial. It helps move your tank away from a plastic appearance and gives it a metallic look. I try to create abrasion with two different pencils to achieve different tones. Metallic colors can also be applied if desired.


I weathered the top of the tank with sponges in rust and anthracite colors. I aimed to polish the areas where the crew would touch. I tried to be careful not to exaggerate it as it seemed a bit excessive.


Finally, I dusted the top of the tank and completed the model. Actually, it wasn't the quality I wanted, but the finished model is the best model after all.


In fact, this kit has some problems. First of all, it's an old kit, and the plastic is very thick. Therefore, you can't bend it as you wish. The side guards constantly break. In the end, I had to fix them to the wheels. Generally, building the kit was not enjoyable.


In the end, I finished another model and put it in the display case. It didn't turn out to be the quality I wanted, but I don't plan to try this camouflage motif again. I plan to continue making models with a new tank. This time, I aim to make another German tank.

Monday, December 11, 2023

IS-7 I Trumpeter I 1/72


One of my favorite tanks is the IS-7 and I have kits for this tank in both 1/35 and 1/72 sizes. I can't find time to make 1/35 size kits. So I got the 1/72 size Trumpeter kit on the counter. I plan to finish this kit right out of the box without any additions.


The construction phase of the kit was pretty easy. The most important reason for this was that the tracks and wheels came out of the box in one piece. Not dealing with tracks saved me time.


I placed the machine gun on the tank in an upright position. In fact, it can also be put in a horizontal position folded. I wanted the machine gun to be in a combat position.


There were no holes at the tip of the tank barrel that came out of the model box. I didn't want it to stay that way and started drilling the holes.


When all the holes were drilled, the barrel looked quite realistic. In fact, some kits come out with etched pieces that look like this. But Trumpeter didn't want to use such a piece.


I decided to make a casting effect on the turret of the tank to give the tank a more realistic look. For this I mixed glue into Tamiya liquid putty.


I applied the mixture randomly on the turret of the tank using a sponge. After the putty I applied dried, a very nice casting effect occurred.


When the tank was finished, I primed the entire hull and turret using a gray primer. Primer is a must do application as it reveals errors during construction.


I fixed the mistakes I saw after the primer. Then I moved on to painting the tank. I did not pre-shade as I will be using ready-made sets for painting.


For painting, I first applied the dark green color to the tank using an airbrush. In fact, it is very important to break the monotony while painting, especially if you are going to make a single color tank. Therefore, it is very important to paint in different tones on different surfaces.


I preferred to use Vallejo brand paints. It dries fast and I love the paint tone. The only problem is that sometimes the colors and the paint names do not match. For example, when you buy a soot color and wait for black, you may encounter a brown paint.


In the next stage of painting the tank, I painted the large flat surfaces using the light green color. In this way, the superficial parts appeared light-colored. Such color modulations are very important in breaking the monotony.


In the next step I painted the protruding parts of the tank a very light green. Since these parts are at the top, they reflect more sunlight. Therefore, it is important that they are light in color.


After painting the hull of the tank, I started to paint the details. First of all, I painted the barrel of the tank with soot color. After the painting was finished, I dry brushed in metallic color. I like the paint on the barrel.


After the barrel, I moved on to the tracks of the tank. I painted the tracks in rust color from Revell's Aqua range. After the paint dries, I dry brushed the parts in contact with the ground in metallic color.


First, I painted the machine gun on the turrret of the tank in anthracite. I painted the attachments, such as the bullet box next to the machine gun, green. Then I dry brushed the machine gun in metallic color.


I painted the sticks used to clean the barrel of the tank in wood color. I used Vallejo's old wood paint to give these sticks a wooden look. Then I made scratches on it using oil paint, but they were not very clear on this scale.


There are machine guns facing forward or rearward in several different places on the tank. I painted these machine guns, which I thought were very unnecessary in terms of use, in anthracite. They were so thin that they were broken several times. I finally fixed them and did a metallic dry brush.


I painted details such as shovel and saw on both sides of the tank. I painted the handles of these tools in wood color and the metallic parts in anthracite. Finally, I did dry brushing and the painting phase of the tank was completely finished.


After the painting phase was completely finished, it was necessary to varnish the tank to protect the paint. Normally I prefer glossy varnish at this stage. But I wanted to use a semi-matt varnish for the IS-7.


In fact, there are two reasons why glossy varnish is preferred. The first reason is to keep the decals between two coats of glossy varnish and prevent them from shining. The second reason is that the glossy varnish makes our work easier by creating a slippery surface during the washing phase.


I used semi-matt varnish for the IS-7. Then I waited for the varnish to dry completely. It is very important that the varnish is completely dry. If the varnish does not dry, it may interact with the white spirit used during washing. As a result, the varnish can be removed from the model.


After the matte varnish was completely dry, I realized that I forgot to paint the periscope glasses on the tank. I painted the periscopes on the turret and the hull with the blue-green paints I had.


When the paint of the periscopes dried, I placed the decals on the tank. In fact, the only made example of this tank has no markings or emblems on it. Since the tank I built is operational, I thought there should be markings on it.
 

I chose the number 980 as the mark on the tank. Actually, I don't know by what criteria these numbers are given. I chose this number myself. I also placed a flag decal on the front of the turret.


At this stage, it is necessary to protect the decals as well. Although glossy varnish was used for this purpose, I continued with the semi-matt varnish that I used at first. I protected the decals between two coats of varnish and continued to wait for the varnish to dry.


I was planning to move on to the washing phase after the varnish had dried. But I saw on the internet that a few modelers made this tank incredibly rusty. So I decided to build a neglected Russian tank. I ordered rust effects online.


The places I originally planned to get rusty were the front and rear fenders and the area above the engine grille. Later, I decided to rust the area where the turret and hull meet. I was going to rust a few places on the turret as well. But I wanted the rust on the turret not to be as much as the hull.


First, I started with the body part where the turret sits. I started with a dark color rust effect and used lighter ones towards the edges. Then Mustafa warned me. Tankers apply oil to these areas so that there is no friction. I also added an oil texture.


In the next step, I moved on to the front and rear fenders. I followed the same sequence in these areas as well. I started with dark-colored rust and gradually lightened the color as I progressed towards the edges. There were sharp lines between the rusty and non-rusty areas in these areas. To prevent this, I did a light wash with rusty washing solutions.


In the parts where the grills are, I wanted rust around the covers and around the grill frames. After applying rust to these areas, I dry brushed the sharp parts of the covers and frames with metallic color. This made the texture look more realistic.


In the turret, I applied rust effect around the covers, around the part where the machine gun is located, and behind the mantlet in front. Again, I washed these areas to blur the boundaries.


When the rust stage was completely finished, it was time for washing. Instead of washing the tank completely, I preferred to do regional washing called pin wash. Because I didn’t want the tank to darken. I did not apply oil paint on this tank.


After washing was done, I applied semi-matte varnish to the tank once again. I did not want to use matte varnish. Because I did not want the tank to be generally dark. So I continued with semi-matte varnish.


After the varnish, my rusty washes were erased. So I had to wash the areas where I applied rust effect again. I did not want sharp transitions in these areas.


After the varnish and rusty wash were dry, I started weathering. First, I started weathering from the turret and started weathering with a sponge.


While weathering with a sponge, I tried to erode the places where the tank crew stepped. If you exaggerate too much, especially in 72 scales, things can get out of hand. Therefore, I did a small amount of weathering with a sponge.


After weathering the turret with a sponge, I dry brushed the metallic areas around the rusty parts with metallic color and polished them with a pencil. Using a pencil really gives a nice look to the tank. It brings out the metal effect that appears on worn-out areas.


Next, I created rusty streaks around the areas where I applied rust effect on the turret. When it rains, the rust flows down. I tried to make these streaks thin according to the scale. They looked good in the end.


I created streaks using ready-made solutions on the parts with protrusions such as periscopes. The streaks I made on these parts were slightly more prominent than the rusty ones. Actually, it would have been better if I weathered them a little more.


I finished my work on this part by washing the entire turret with dust solutions. The color of the turret remained one tone lighter than the body. But I left the turret aside, attributing it to being under the sun.


I started weathering with the grille part of the body. I created soot and dust effects on the parts that allow air to pass through the grille. Again, to prevent details from being lost, I dry brushed these parts with metallic color and polished them with a pencil.


I painted the exhaust outlets at the back of the next tank in rust color. I created soot effects on the tips of the rust-colored paint. Then, I finished the corner parts by dry brushing them with metallic color and polishing them with a pencil.


I created soot effects where the exhaust fumes come into contact with the body. You need to be very careful when creating soot effects. Because if you overdo it, the black color will erase everything underneath. Therefore, I tried to use very little black color and create streaks over it.


I washed the bottom parts of the two gasoline cans at the back with dust solutions. Then, I created oily streaks downwards from the parts where gasoline was filled. Finally, I polished the corner parts with a pencil and finished my work on the cans.


I created dust and mud effects on the inside of the rear fenders of the tank. I also applied dusty washing and streaks to the upper parts. I completed this part by creating mud and dust on the back side facing the ground.


I created streaks from the bottom of the periscopes and protruding parts at the front of the tank. I used both streak solutions and rusty liquids here. I also painted the inside of the front lights in bright colors.


Since the front part is made to extend forward like an arrow, I dry brushed the metallic edges. I also polished the parts where I dry brushed with a pencil. I applied the same process to the front fenders where I created rusty streaks.


I first applied mud effect to the parts of the front facing the ground. Actually, I think I overdid it a bit. It looked too muddy compared to the rest of the tank. Finally, I did a dusty wash and finished the weathering work on the front.


I had already painted the tracks and wheels of the tank in rust color and dry brushed them. I polished around the tracks a little more with a pencil. I also polished the surfaces of the wheels that come into contact with the tracks, but the green color remained prominent because I didn’t do enough.


Since I don’t like to do heavy weathering, I created dust around the surfaces where the wheels come into contact with the tracks. I poured pigment on the body part that remained inside the wheels and dripped turpentine over it to fix the pigment in place.


I first did a dusty wash on the outer surfaces of the tracks. Then I applied both dusty and rusty pigments to the inside. I fixed them in place by passing turpentine over them.


After the washing and pigment application, the wheels started to look too uniform. So, I did another very light black wash. When it became more pronounced, I tried to balance it by doing another dusty wash over it.


I first made rusty streaks on the side surfaces of the tank’s body. Later, I added more streaks with ready-made streak solutions. I also aged these parts by doing a dusty wash.


I thought dust would accumulate around the tools on the body, so I did a dusty wash on those parts too. I polished the corners of the metal tools with a lead pencil.


In the final stage of weathering, I airbrushed mud effects on the sides of the tank that I took with a brush. If you don’t do this application carefully, the whole tank can become muddy. Therefore, I tried to blow it slowly and from a distance.


In the last stage, I checked the tank overall and corrected the places that caught my eye. I did a little more washing on the rusty parts. When I decided it was completely finished, I took pictures of it and finished the model.


I don’t know if it’s because I love the IS-7 tank so much, but this model has been my favorite so far. I put it in the showcase after finishing it and continued my hobby with another 72-scale model.